RANGE EXTENDERS
about some non-standard winter belay techniques
There are skiers who feel more comfortable hopping turns in a highly exposed 50-degree face than rappelling 50m from a solid anchor.
Having come to steep skiing from the other direction, from mountaineering and climbing, it feels natural to me to use ropes and advanced rock protection to extend my range in winter terrain.

I am sure there is documentation of some elaborate techniques out there and this contribution has no ambition to cover it all nor to provide the ultimate toolset.
It is about sharing some techniques and gear recommendations that have proven very helpful to me but which I don’t see many other skiers apply.
THE ROPE
I see four main purposes of a rope in the context of skiing:
- Belaying through short sections with slab risk
- Rappelling
- Protecting climbing sections
- Glacier travel / crevasse rescue
This article covers neither glacier travel nor the skills needed protect hard technical climbs on lead.
Those techniques are well documented in the classic mountaineering books.
Belaying through short sections with slab risk
High avalanche risk is of course a no-go for any steep skiing mission.
Except maybe for very firm spring snow, even a ‘LOW’ means there’s still chances of triggering a small slab.
All it means is that the probability is low and that a potential slab is likely to be of smaller volumes.
And as Lukas Dürr from the Swiss Institute for Snow and Avalanche Research SLF puts it, “a wheelbarrow-sized mini slab can have severe consequences in exposed terrain.”
Having a rope at hand has been useful to me in two ways:
- in situations where I would have turned around without a backup, and
- by adding extra safety in ‘just-in-case’ situations.
Rappelling
The option of being able to rappel grants access to otherwise inaccessible lines and can be a return ticket if you face a steep snow-free section low in a couloir.
Both practices, belaying and rappelling, can be managed with a lightweight rap line instead of a full-fledged single rope.
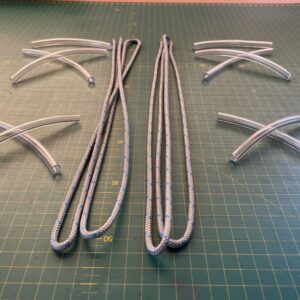
This is why I usually pack a 6mm hyperstatic rap line of 60m length.
The one I use (https://www.salewa.com/master-cord-6mm-spool-00-0000000639 ) is made of a UHMWPE (‘Dyneema’) core and a PA (‘Nylon’) sheath and has a breaking strength of 16kN.
This solution takes up minimal volume and adds little weight to my pack while providing the full 60m range.
If you want to maximize your ‘rap-able’-rope-length-to-weight-ratio, you may consider bringing along the BEAL ESCAPER (https://www.beal-planet.com/en/tapes/1563-escaper.html ). The combination with a thin rap line, though, requires quite some tactics to increase friction in your device (one strand of 6mm – not so easy…).
Regarding rap lines, two characteristics need to be considered if you are used to conventional ropes (dynamic climbing ropes):
- Rap lines are hyperstatic and must not be shock loaded.
- They are too thin for normal belay/rappelling devices.
Conventional climbing ropes (EN 892) will stretch up to 50% of their length before reaching their breaking limit and thereby absorb significant amounts of a fall’s shock load.
Shock loading a rap line on the other hand can overload the system and lead to a failure of the weakest element.
In other words, leading a vertical pitch on a hyperstatic line is like climbing on the sharp end of a hemp rope tied around your chest.
The other limitation is the lack of friction created in belay devices.
There are different ways to approach this, but all should include a ‘third hand’ backup.
Make sure to bring a supple and thin prussik.
When using a conventional tube style device (ATC, Reverso, etc.), these measures increase the braking friction:
- thread both strands through one slot
- attach two karabiners
- use karabiners with ‘not-so-round’ profiles
If you have to rappel over vertical or overhanging sections, consider using a doubled Munter hitch.
This also works great for lowering your friend with them badass heavy skis.
Ropes are great – especially when you have a solid anchor to attach them to.
Anchors in the context of steep skiing
Real mountaineers like Simon Yates can lower you from a ‘belay sit’ in the snow. But when both partners have to rappel, I prefer rock to snow.
For me, the following rock protection gear works great for steep skiing missions as it combines lightweight versatility and reliability in a variety of rock (quality, conditions and structure).

“Friends are overrated on powder days” – and pitons massively underestimated.

Most rock climbers don’t associate pitons with the word lightweight.
Think of a set of 10 stoppers needed to protect a pitch and then of 10 pitons…
BUT:
- One piton is more versatile than one stopper. There’s almost always a slot for a ‘knifeblade’ type of piton.
- In most cases, I need no more than 2 or 3 pitons.
- A great part of the piton kit’s weight is already on your backpack (hammer on your ice axe).
If Russian mountaineers hadn’t already done so, these pecker-style pitons would need to be invented as the perfect steep skiing anchor.
Swiss trad climbing pioneer Silvan Schüpbach (http://slack-line.ch/ ) had introduced me to the fascination of these peckers made by Krukonogi.


Since these tools are not so easy to find on every corner, I’ve decided to offer a small selection of them here in my webshop:
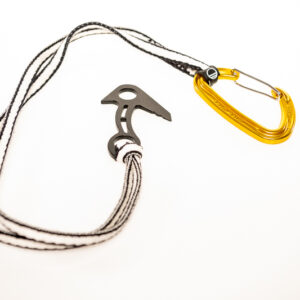
I had ordered a dozen of these peckers directly from Krukonogi some months before the Invasion of Ukraine. Today, their web shop is no longer accessible, not sure if there is a correlation.
Lightweight Rocks are another great element of protection. They weigh virtually nothing and often work even in the harshest environments.

When there was no other option, I have rappelled from a snow bollard.

Ski mountaineering harnesses like the Salewa Ortles (https://www.salewa.com/ortles-harness-00-0000001751 ) are amazing for their super low weight and the possibility to put on while you stay on your skis.

One last thing about weight optimization in winter mountaineering.
Why would anyone ever pack a metal insulated bottle?!
I pour hot tea into a non-insulated bottle and wrap it into my down jacket, starting with its hood. This bundle then goes into a bag to keep it all in position.
This way, my tea stays warm for 5 hours and more.
What is your experience with such ‘range extender’ techniques?
Thank you for your contributions via email!
Stay safe and have a great time out there!
Andreas
